Record Animation: Track Sections Data
If we were to run the RecorderProgram and then run our coaster right now, it would just valley. It wouldn't go up the lift or be stopped by ay brakes because we have not defined it. In this section, we will show how can make our train traverse the whole layout and not be stuck where it is.
About PhysicsSimulator and TrackSectionsData
The PhysicsSimulator API is designed to simulate track-based physics. This includes roller coasters, but it can also be used for drop towers/tracks and omni-movers as well.
The TrackSectionsData is used by PhysicsSimulator to define how to affect physics for a train for each position on a track.
You can see the PhysicsSimulator API and the PhysicsSimulator tutorial for more information.
The hierarchy of TrackSectionsData can be seen as the following (from highest to lowest):
TrackTypedefines the physics with which to move our coaster train.TypeSectiondefines where on our track the physics given by theTrackTypewill move the train.TrackSectionsDataholds all of theTypeSectionstogether.
Editing the TrackSectionsData
TrackSectionsData is located under the RecorderProgram. It's setup to include all of the TrackSectionsData used by our ride, which can be multiple.
By default, we have Main. It is already setup in the default template to use this TrackSectionsData so you do not need to touch anything in the code.
When we open it up, we can see the following layout:
- DefaultTrackType
- DefaultTypeSection
- TypeSections
Defaults (DefaultTrackType and DefaultTypeSection)
DefaultTrackType and DefaultTypeSection are the "defaults" used when the simulation cannot find a TrackType or TypeSection for a given section.
This lets us be lazy in our defining of our TypeSections and not have to do one for every section.
With coasters, we using have the default be, well, coasting, or just moving according to physics (Gravity and Friction). As such our coaster template has it set this way as well.
TypeSections
The TypeSections folder holds all of our TypeSections. Pretty straightforward.
About TypeSections
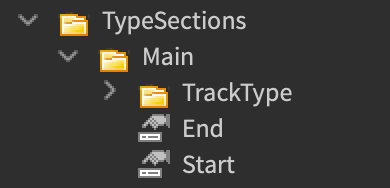
Opening up the TypeSections Folder we will see our included TypeSection, Main.
TypeSection Layout:
- Start: NumberValue
- End: NumberValue
- TrackType: Instance or
- TrackTypes: Instance (for KeyframeTypeSections)
The Start and End value define where on the track the section starts and ends respectively.
KeyframeTypeSections and SingleTypeSections
There are two different types of TypeSections KeyframeTypeSections and SingleTypeSections.
SingleTypeSections only have one TrackType and are rather simple.
KeyframeTypeSections, on the other hand, can have multiple and were created as a way to automatically change the TypeSection's TrackType the longer a train is in the section.
This is mainly useful for sections such as LSM launches or brakes, when you want to try to make it look like it's powering up to speed-up or slow-down a train or when you want it look like the the momentum of the train affects the section for a bit.
How they transition can be thought of as similar to how animations work as they both use Keyframes. As the animation plays, it's current time changes and thus the keyframe it is at. You can have it transition in-between each Keyframe using Easing functions.
For this tutorial, we will NOT be using KeyframeTypeSections as they are are a bit more complicated than SingleTypeSections.
Converting Between SingleTypeSection and KeyframeTypeSection
Currently, the TypeSections may be setup as KeyframeTypeSections instead of SingleTypeSections.
Before we start editing, make sure to covert to SingleTypeSections!
This note will be removed if the default template changes back to SingleTypeSections
Please follow this tutorial to convert between SingleTypeSections and KeyframeTypeSections
Converting a normal SingleTypeSection to a KeyframeTypeSection simply requires a Folder named TrackTypes (with the added s compared to the TrackType with a "single" TypeSection). When the framework sees this folder when converting the Instance data, it automatically assumes it is a KeyframeTypeSection.
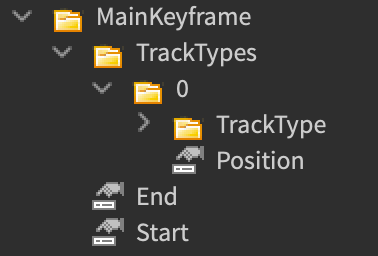
To convert a KeyframeTypeSection to a SingleTypeSection, open up the Keyframe folder (any folder inside of TrackTypes) whose TrackType that you want to use and drag it's TrackType folder all the way up to the same level as Start and End. Then, delete (or rename if you are lazy) the TrackTypes Folder.
Editing the TypeSections
If you do not know how to get the track position, please refer back to the previous tutorial.
We will first get the positions for all of our TypeSections, they when will edit the TrackTypes for each one.
Before I begin editing, I like to look at when sections this has and duplicate and rename TypeSection data for each of them.
For this DoubleLoopDoubleCorkscrew layout, we will simplifying it into the following:
- Station (marked by our station platform)
- Lift (from the shortest to just beyond the tallest part of the ride)
- Brakes (marked just behind the stations)
- Station is at
100, 220 - Lift is at
404.883, 664.863 - Brake is at
0, 100
Pass Track End Sections
Although our current track doesn't need this, there may be times where you want to set a section that goes past the "end" of our track.
What I mean is that the section extends from [X, trackLength] to [0, Y], where X and Y are our start and end positions, assuming X is greater than Y.
You could create two TypeSections where one goes from [X, trackLength] and the other goes from [0, Y], but if you wanted to change anything about the TrackType, you would need to change it for both. You would also need to adjust the trackLength value if you edit the track (though you could just set this to a extremely large value and it would work).
Luckily, you can set the Start and End positions to X and Y respectively, still assuming X is greater than Y, and it will work the same.
To illustrate, say I wanted to have a section passing the track end that goes from 400 and 50.
It will create a TypeSection that goes from [400, trackLength] to [0, 50]!
Editing the TrackTypes
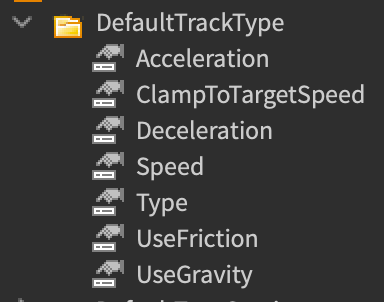
Now will individually edit each TrackType. To do so, open up the TrackType folder in your TypeSection.
TrackType Properties
The TrackType includes multiple properties that determine how to move the train. These are as follows:
Type
How this section will affect the train.
See the move MoveTypes for more detailed information.
Acceleration
Accelerates the train.
This number is a multiple of gravity (the gravity value passed to PhysicsSimulationState).
This value MUST be greater than or equal to zero
Deceleration
Decelerates the train.
Like acceleration, this number is also a multiple of gravity.
This value MUST be greater than or equal to zero
Speed
This is our target speed measured in Studs per second.
UseGravity
Flags whether gravity will be applied.
If true, train will be accelerated on sloped sections using a value determined the current track angle and the current gravity acceleration.
UseFriction
Flags whether friction will be applied.
If true, train will constantly be slowed by "counter-forces". The value is a catch-all for air-resistance and track friction.
ClampToTargetSpeed
Clamps the speed so that, when it reaches this, it stay at this amount unless other forces such as gravity or friction overcome this.
MoveTypes
A MoveType indicates how the track section will apply physics to a coaster train. You set it in the Type IntValue of the TrackSectionsData.
More information can be found in the MoveType Documentation, though each of these names should be self explanatory.
Make sure you use the number value on the left side of this chart to set it, not the name itself.
0 = None
1 = Accelerate
2 = Decelerate
3 = Transport
4 = Constant
Section Settings
This section goes over what value we will set for each of our sections. This section goes fast as it's just a bunch of property setting.
Station Section
- Type = 3 (Transport)
- Acceleration = 0.125
- Deceleration = 0.125
- Speed = 7.5
Even though our station in our game is on a sloped section, I want to show how you do it for most stations which are usually on flat track sections
Lift Section
- Type = 1 (Accelerate)
- Acceleration = 1.125
- Deceleration = 0
- Speed = 12.5
The reason why are acceleration is greater than 1 is because we want it to counteract the acceleration of gravity.
We are obviously not setting the specific force of the lift to propel it, but the target speed we want it to be at, so we set it to at least be greater than gravity.
Brakes Section
- Type = 2 (Decelerate)
- Acceleration = 0
- Deceleration = 0.75
- Speed = 10
Only use decelerate for trims or brakes on downward sloped sections!
Now that we have the positions, you should be able to Run the Program with no problems or hiccups.