Project Template
This tutorial is designed to get you familiar with how a rtrf project/ride is setup.
The template is designed with coasters in mind and as such has multiple things to make it easier to get going.
Create a Project
The plugin UI is still a work in progress
Plugin -> Create Project -> Enter Project Name -> Accept
[Image here]
For this tutorial, we will set our project name to Coaster
Overview
- Installs:
- RideData
- RecorderProgram
- RideScripts

The project template is designed more for coasters than other tracked rides.
In later tutorials, you will discover how to make non-coaster rides.
RideData
The Game's RideData folder contains data used by each ride in order to be setup and run.
The Game RideData Folder can be found in ReplicatedStorage.
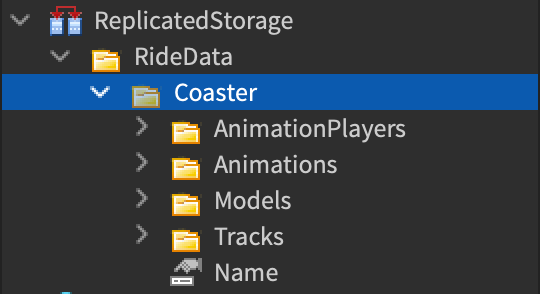
Our folder's name is Coaster and contains the following folders:
- AnimationPlayers
- Animations
- Tracks
- Models
It also has a StringValue named Name
AnimationPlayers
This folder contains the AnimationPlayer data for all animations players in the ride.

If you are coming from v1, there is reduced functionality in setting up an AnimationPlayer from the ride data.
Namely, you can no longer set the start animation, start time, start delay, isLooped.
I thought it was too restrictive or prone to setup errors at the time of writing v2.
Will be re-added later, most likely with the removal of start delay as that was temp solution for start time.
Instance Data:
{
    Model: StringValue,
    Tags: Folder,
}
Model
This can either be a:
- Model
- ObjectValue
- StringValue
However, the resulting Model MUST be a Model Instance.
- The
Modelis the simplest, just being the actual model used only by the AnimationPlayer. - The
ObjectValue'sValuereferences a Model somewhere in thegame. This Model is cloned and used by the AnimationPlayer - The
StringValue'sValuereferences the name of a Model in theModelsfolder of this RideData. A clone of that model is also used.
The template uses the StringValue method, as I recommend using this method for all of you AnimationPlayers. The StringValue Value is set to TrainModel, which can be found in the Models folder of the RideData
See Models for more information.
See also AnimationModels for a list AnimationModels and how to set it up.
Tags
This Folder contains a list of tags used in the TagSystem for AnimationPlayer.
See use with RideManager:getAnimationPlayersWithTag()
Each child represents a tag for the AnimationPlayer.
The tag name is extracted from the child's name, so you can use any Instance, though it's recommended you use a Folder.
In the template, a tag is already added with the name Train.
Animations
This Folder contains all the Animation data for the ride.
You'll mostly see these as ModuleScripts.
It is NOT recommended to edit these (unless you know what you are doing) as they can be overwritten by the plugin, thus not saving your work.
The template contains a default animation named RideAnimation that moves 10 studs and is 10 seconds long.
This will usually be overwritten by the plugin.
Tracks
This Folder contains all the Tracks data for the ride.
Tracks define the 1D to 3D relationship used to position a train or model in the world and move it. In other words, it defines the hills and curves that our train goes around.
See Track Setup for more information on how to create one from scratch.
The template contains a default track, named Main of about 10 studs long. It is recommended that you edit this.
Models
This is were the Models referenced by name in the AnimationPlayer data are kept
It was designed this way so that AnimationPlayers which share the same model can have it easily swapped out without setting all the ObjectValues again.
See Train Model Setup for more information.
The template includes a very simplistic train for you named TrainModel to get you quickly up and running. This train is already setup for use with the RideSeatPlugin. It is recommended you look at how it works and the different CFrameCalculationTypes.
Recorder Program
ModuleScript program used to generate animations for the system
The returned function is ran by the plugin with api passed as an argument.
A more in-depth tutorial can be found here: link here plz
The RecorderProgram contains two children:
- RIDE_NAME
- TrackSectionsData
RIDE_NAME
A StringValue which contains the Project's name
In this case, the value should be Coaster.
TrackSectionsData
Defines how to affect physics for a train for each position on a track.
This folder is setup so that multiple TrackSectionsData Instance data can be held in it and referenced later.
Inside this folder, you should see another folder named Main, which contains our "Main" TrackSectionsData.
See how to setup a TrackSectionsData for more information.
Ride Scripts
Server and client (local) scripts used to setup and run a ride
Server (_Server) is used for syncing while the client (_Client) is used for actual moving of the model.
In these scripts, you can setup Plugins which modify and add functionality to AnimationPlayers and also setup and play AnimationPlayers.
As the template is designed for coasters in mind, the default functionality sets up the ride in "automatic" mode. This means:
- Assumes an Animation named
RideAnimation - Train AnimationPlayers have the tag
Train - Train AnimationPlayers are setup to run
RideAnimation.length / NUMBER_OF_TRAINSseconds apart. RideSeatPluginis setup all Train AnimationPlayers on both server and client.
This also means you will need to modify the RideScripts if you want to run it with manual dispatching or use a block system.
With the coaster specific template in mind, an easy way to add extra trains is to duplicate the included template AnimationPlayer.
Keep in mind that adding more trains decreases this value and makes the trains run closer and closer to each other.
This could make the trains "collide" with each other at certain parts in the ride, namely, the station area where the train usually stops for a few seconds.